If you are on an adventure with some friends, then it is crucial to maintain communication among yourself at the moment. You are not getting on the network on your mobile or any communication medium. So what should you do now?
It is best if you use a walkie-talkie to keep in touch. So remember, I made a walkie-talkie. With this walkie-talkie, you can communicate one to one within a distance of one and a half kilometers.
This walkie-talkie allows you to hear a good-quality sound. I used a 500 milliamp-hour battery, so you can run this device all day on a single charge. It’s easy to make, and I’ll teach this guide step-by-step how to make a walkie-talkie.
You Can Make This Walkie-Talkie Within 5 Steps.
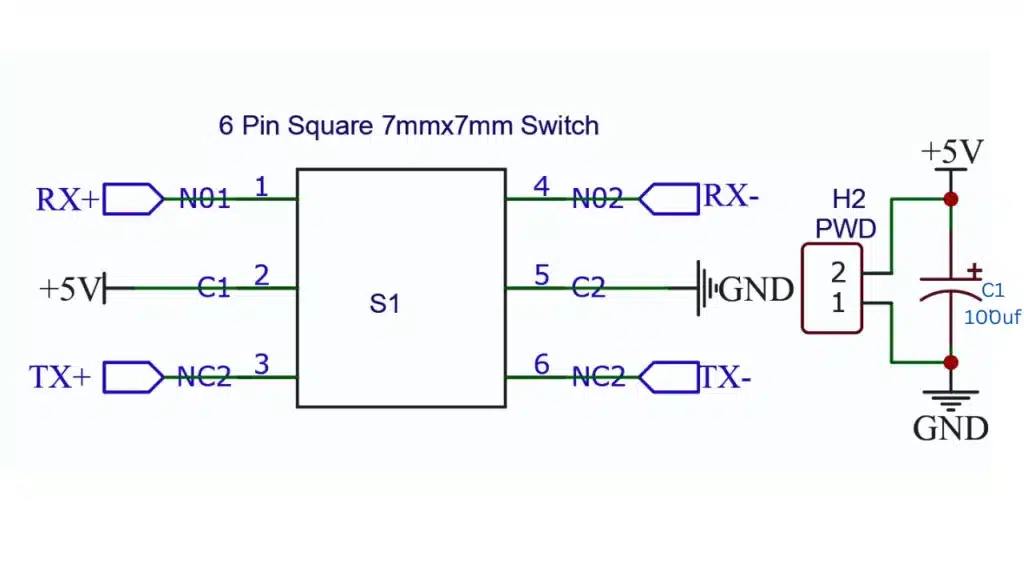
Power Supply Process
Here I am using a 3.7-volt lithium battery to run this walkie-talkie but unfortunately, you can’t run this device with 3.7 volts so that’s why you definitely need a boost
converter to boost up to 5 volts in this step another important subject is how to charge the 3.7-volt lithium battery. so that’s why I am using here lithium charger.
how to catch a voice
voice you need a condenser mic. this mic will give an electric pulse signal and this weak signal goes to a pre-amplifier Ic. here I am using lm35 8 IC as a pre-amplifier this is this provides me with a good amplitude microcontroller with an acceptable electric pulse.
walkie-talkie furnace is processing
I am using it here at Mega H which is a low-cost. IC and this IC has 8 KB flash memory, and this is an 8-bit IC. you can use it instead of Arduino Uno Arduino Nano Arduino Mega as you want. yeah, you need to program this. IC so that’s why I am using my homemade AVR programmer to program this if you want to know how to make this AVR programmer then you can watch my previous video link. To make this walkie talkie you will need RF 24 master level 5 to make digital audio sense, and the code is really small the coding also will be link:
 build-doxygen:
    runs-on: ubuntu-latest

    steps:
    - name: checkout
      uses: actions/checkout@v2
    - name: overwrite doxygen tags
      run: |
        touch doxygenAction
        echo "PROJECT_NUMBER = v1.0.${GITHUB_SHA:0:7}" >> doxygenAction
        echo "@INCLUDE = doxygenAction" >> Doxyfile
    - name: build doxygen
      uses: mattnotmitt/doxygen-action@v1
      with:
          working-directory: '.'
          doxyfile-path: './Doxyfile'
    - name: upload to github pages
      # if: ${{ github.event_name == 'release'}}
      uses: peaceiris/actions-gh-pages@v3
      with:
        github_token: ${{ secrets.GITHUB_TOKEN }}
        publish_dir: ./docs/html
okay let’s move to another process another walkie-talkie transmitting data to this processor, and this purse convert this data as the analog signal to the speaker for sound. actually, how does this processor work? okay, I will explain to you this is quite easy to collect your audio signal from your mic and provide it to transmit to another receiver. you can call this unit as a brain of this walkie-talkie.
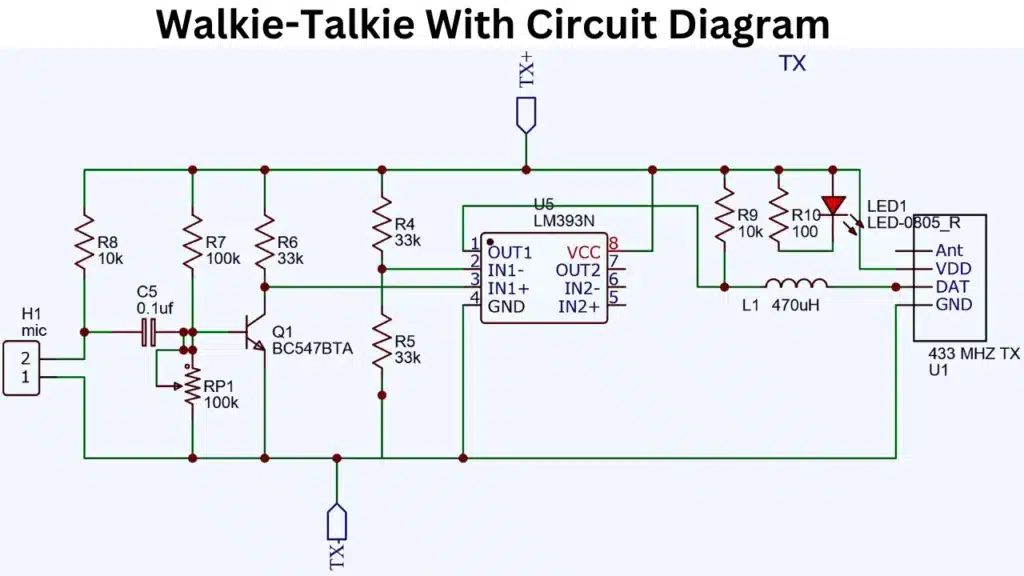
Transmit Audio Signal
How to Transmit an Audio Signal to Another Device. the audio signal to another device to transmit an audio signal. I am using an array of 24 Wi-Fi modules. this is a pre-Amplifire version this Wi-Fi module can cover up to 1 and a half kilometers. I think this is a good deal, remember one thing this module requires 3.7 volts not more otherwise this Wi-Fi will burn instantly, that’s why I am using here AMS1117 regulator IC to provide a 3.7 volt supply.
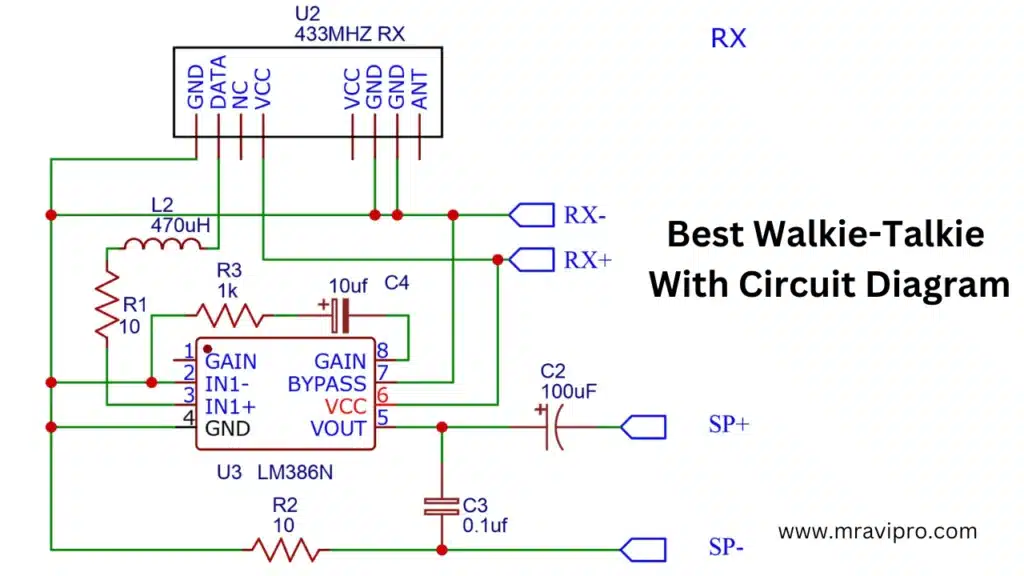
produce loudspeaker
this atmega8 is not capable of producing a loudspeaker so here you record a new IP keep in mind I am using an 8403 IC this is a 2 and this IC consumes very very very low current. I think this is a good deal for battery saving. so keep it in mind,
I started making a diagram and after comparing the diagram I converted it into PCB and you can see this piece, of resin is not bad. so that’s why I hooked up 5 volts on this board okay now time to check the first aspirate so I want to say something also,
I think you can hear some noise this is for Wi-Fi transmitting noise because this sound wave is very low frequency this will work actually as the oldest AM radio.
If you want to make a spy camera then click on this link
The Conclusion
Thanks for reading the full article. So if I know how to make this Walkie-Talkie. If you enjoy reading this post, don’t forget to like, share and comment. Here we discuss two Walkie-Talkie that you can make your choice.