Welcome to our in-depth manual on fixing 48-volt chargers with explanations of the circuit diagrams. You’ve come to the right place whether you need help with your 48-volt charger or just want to learn more about how it functions. In this article, we’ll walk you through the process of troubleshooting typical issues and comprehending the circuit diagram for a 48-volt charger. So let’s explore the intriguing world of 48 Volt Charger Repair now!
The Basics of a 48 Volt Charger
To recharge batteries that operate at 48 volts, a 48-volt charger is a crucial part. This kind of charger is frequently found in golf carts, renewable energy systems, and electric cars. They offer a regulated charging current to guarantee the best battery performance and longevity.
Safety Precautions Before Starting the Repair
A 48-volt charger is an essential component for recharging batteries that run on that voltage. These chargers are typically seen in electric vehicles, renewable energy sources, and golf carts. In order to provide the highest battery performance and longevity, they offer a regulated charging current.
- Always disconnect the charger from the power source before starting any repairs.
- Wear protective gear, including safety goggles and insulated gloves.
- To avoid the buildup of harmful fumes, work in well-ventilated areas.
- Keep water and other liquids away from the charging area to prevent electrical shock.
- In case you are unsure or uncomfortable with any aspect of the repair, consult a professional…
Tools and Equipment Needed for Repair
You will require the following devices and tools to successfully fix a 48-volt charger:
- You can measure voltage, resistance, transistor, MOSFET, and other things with a multimeter.
- Employ a soldering iron to assemble and disassemble components.
- Screwdriver Set: Required to access internal components and open the charger’s case.
- Wire strippers: These are tools that remove wire insulation to allow for secure connections.
- Heat shrink tubing: Aids in protecting and insulating wire repairs.
The charger not turning on
- Make sure the power source is operating properly by checking it.
- Look for any damage or loose connections in the charger’s power cord.
- Check to see if the fuse in the charger is still good and replace it if necessary.
Charger not providing an output
- With a multimeter, determine the charger’s output voltage.
- Check the output terminals for corrosion or loose connections.
- Look for any signs of damage on the rectifier bridge and diodes.
Charger overcharging or undercharging the batteries
- Check the voltage and charging current to make sure they fall within the acceptable range.
- Examine the charger’s voltage regulation and control circuits.
- Any defective parts that are the cause of the charging issues should be replaced.
Charger producing excessive heat
- Make sure the ventilation system for the charger is not hindered or blocked.
- Verify the cooling fan’s functionality.
- Check to see sure the charger isn’t operating at a higher current than it is rated for.
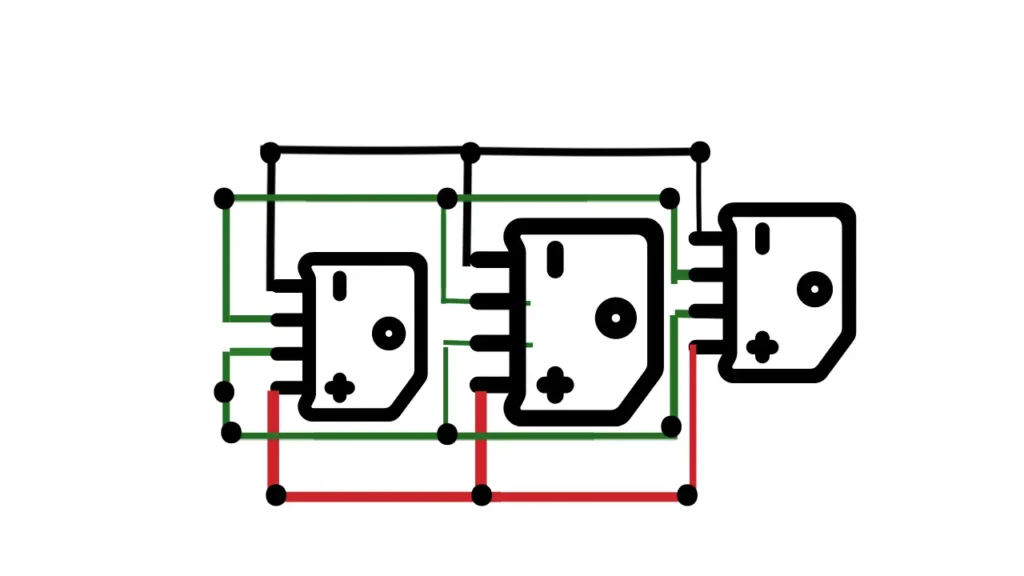
Circuit Diagram Explained
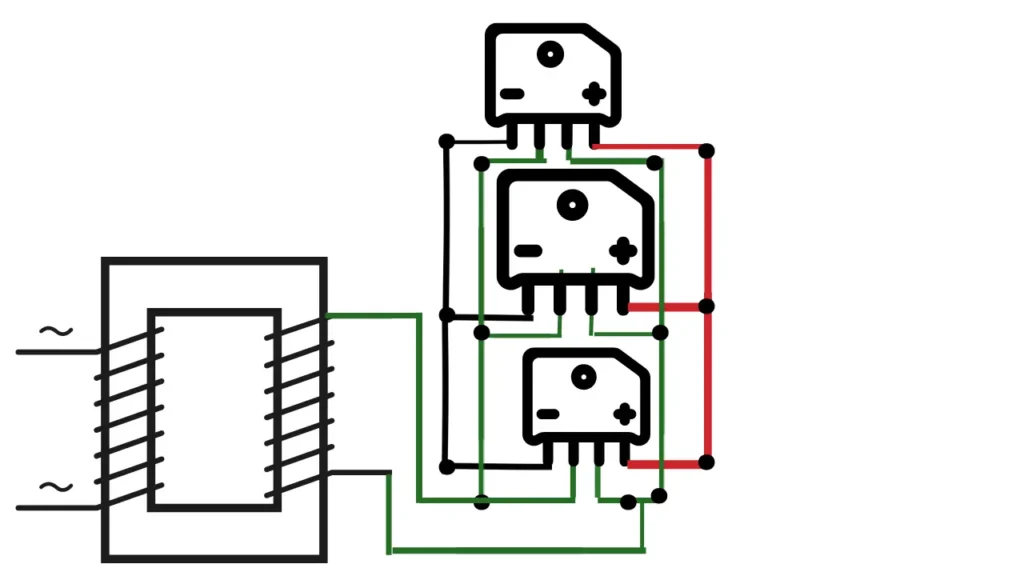
A 48-volt charger’s circuit diagram must be understood in order to perform successful troubleshooting and repairs. Typically, transformers, diodes, and capacitors make up the diagram. Together, these parts transform the AC power coming from the source into DC electricity that can be used to charge the batteries.
It helps to understand the meanings behind the electrical symbols while analyzing a circuit diagram. You might consult online resources like
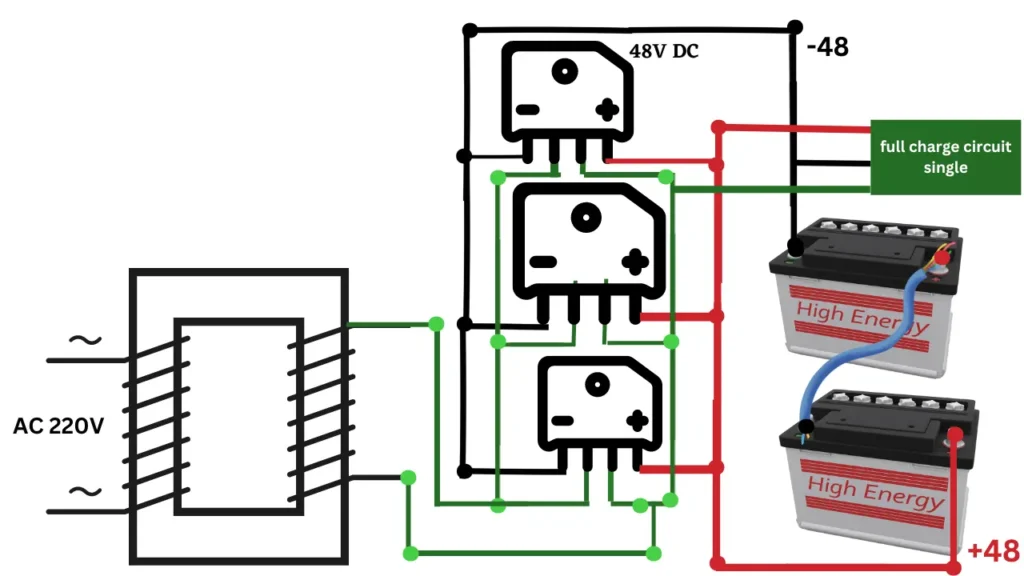
Full Circuit Diagram Download
- Also, Read This Article:- 3.7Volt Li-ion Battery Charger Full Details & solution.
- Also, Read This Article:- How to Make a BLDC Motor ESC Using MOSFET
- Also, Read This Article:– 555 timer ic use throttle or accelerator sensor circuit diagram
- Also, Read This Article:- How to Make a BLDC Motor ESC Using MOSFET
- Also, Read This Article:- 5V PWM Signal Booster Convert 12V PWM Signal Generator
- Also, Read This Article:- How to Make a BLDC Motor ESC Using MOSFET
Conclusion
A circuit diagram explanation can make repairing a 48-volt charger a satisfying experience. Use the step-by-step instructions in this article to solve typical charger issues. Throughout the process, keep in mind to seek professional advice if you feel unclear or overwhelmed. Your 48-volt charger can function at its best and last longer if you have the correct information and resources.
FAQs
How can I identify the correct polarity for the charger’s output terminals?
The positive and negative terminals are often identified in the circuit diagram or labeled on the charger. Red for the positive terminal and black for the negative.
Can I repair a 48-volt charger without any prior technical knowledge?
While some fundamental technical know-how is helpful, fixing a 48-volt charger without any prior experience can be difficult. Consult a specialist if you are uncertain or uneasy about the repair procedure.
Where can I find a circuit diagram for my specific 48-volt charger model?
To find the manufacturer’s website or online discussion boards where users contribute circuit diagrams for various charger models, conduct an internet search. It’s important to consult the charger’s user manual or get in touch with the maker.
Are there any safety certifications or standards for 48-volt chargers?
Indeed, 48-volt chargers must comply with a number of safety regulations and certifications, including UL, CE, and RoHS. While buying or fixing a charger, safety rules must be adhered to.
Can I use a 48-volt charger for other voltage-rated batteries?
That is not advised.
For batteries with various voltage ratings, use a 48-volt charger; otherwise, the batteries may be harmed and there may be safety concerns. Choose a charger that is particularly made to handle the voltage of the batteries you are charging at all times.
Is it possible to upgrade a 48-volt charger to support higher charging currents?
A 48-volt charger may occasionally be upgraded or modified to allow larger charging currents. However, only qualified people should attempt this as it necessitates significant knowledge and expertise in charger design.