Do you wish to improve the performance of electric bikes because you are passionate about them?
A fun and affordable project is creating your own electric bike speed controller at home.
We will lead you through the process of building an electric bike speed controller from scratch in this in-depth guide.
We’ll give you a free circuit schematic download and thoroughly explain each step to make sure you fully comprehend the project.
Let’s dig in and learn how to manage the speed of your electric bike!

How to Make an Electric Bike Speed Controller
You will want a few necessary parts and tools in order to build an electric bike speed controller at home. Before beginning the project, you will need the following items:
- Arduino Uno board
- Motor controller module
- Potentiometer
- Resistors
- Capacitors
- Diodes
- Transistors
- Jumper wires
- Soldering iron
- Solder wire
- Breadboard
- Screwdriver
- Multimeter
The Required Components
Make sure you have all the above-mentioned components before beginning the construction. Electronic supply shops and online vendors have these parts in abundance. To ensure a smooth building process, double-verify and arrange your components.
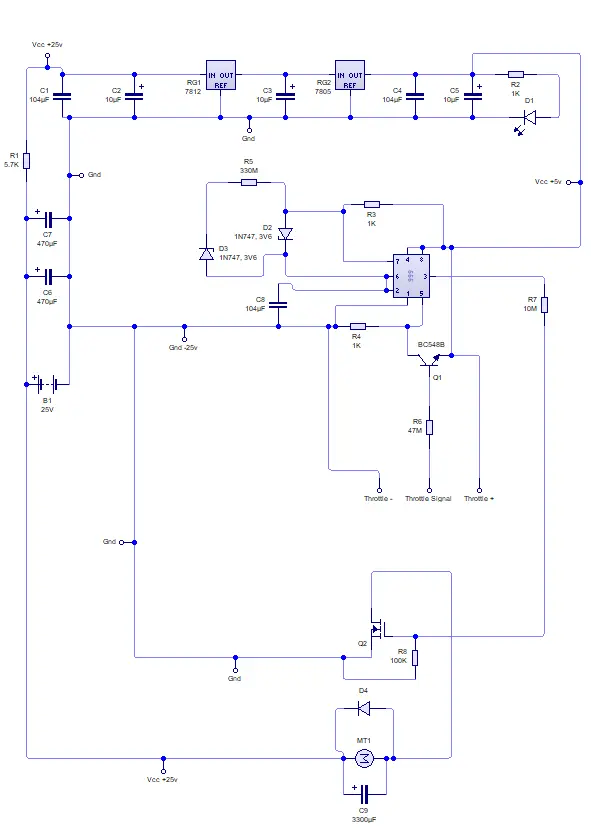
Download the Circuit Diagram
Visit the following link to download the electric bike speed controller’s circuit diagram: Download a circuit diagram. You can use this diagram as a visual reference to better comprehend the wiring arrangements and general circuit layout.
120w motor use
Set Up the Arduino Uno
Place the Arduino Uno board on your workbench to start. Your PC and the Arduino board should be connected using a USB wire. If you haven’t already, install the essential Arduino software. Later on in the process, you can program the Arduino board using this software.
prepare the Breadboard
Make sure your workbench is clean and debris-free before setting the breadboard there. The circuit will be constructed and the required connections will be made on the breadboard.
Connect the Components
Connect the components on the breadboard by using the circuit schematic that you previously downloaded. Jumper wires can be used to connect numerous parts, including transistors, diodes, capacitors, and resistors. Make sure all connections are correct by paying close attention to the diagram.
Program the Arduino
It’s time to program the Arduino board when you’ve completed the circuit assembly. Write the necessary code for controlling the electric bike’s speed by launching the Arduino program on your computer. Depending on the particular motor controller module you are using, the code will change. For the correct code, consult the module’s documentation or internet sources.
Upload the Code
Use the USB cable to connect the Arduino board to your PC. After compiling your code, upload it to the Arduino board. The speed of the electric bike can be controlled by the board’s microcontroller thanks to this technique of transferring the code to it.
Test the Speed Controller
Test the speed controller now that the code has been successfully uploaded. Attach the proper motor and power source to the motor controller module.
source. Switch on the electricity and modify the motor’s speed using the potentiometer. Make sure the speed control is operating properly by watching how the motor reacts.
Fine-tune and Refine
You can adjust and improve the speed controller’s performance after making sure it is operating as intended. Investigate the effects of various potentiometer settings on the motor’s speed. In order to reach the appropriate speed control range, make any necessary modifications.
Circuit diagram Download
- Also Read This Article:– 555 timers ic use throttle or accelerator sensor circuit diagram
- Also, Read This Article:- How to Make a BLDC Motor ESC Using MOSFET
- Also, Read This Article:- How to make a 3-phase Bldc motor controller
Conclusion
Homemade electric bike speed controller construction can be both rewarding and economical. You can adjust the speed of your electric bike and improve its performance by following the instructions in this guide and using the attached circuit diagram. Keep in mind to be cautious and put safety first while working on the construction. The excitement of personalizing your ride may now begin as you get started on your DIY electric bike speed controller project!
FAQ
Can I use any Arduino board for this project?
Although there are other Arduino boards available, we advise choosing the Arduino Uno board for this particular project owing to its availability and adaptability.
Are the required components expensive?
No, you won’t have any trouble locating the parts you need at an inexpensive price from local electrical supply shops or online merchants.
Is it necessary to program the Arduino board?
The Arduino board’s programming is, in fact, a crucial component of this project. You may adjust the speed control algorithm to suit your preferences and control the speed of the electric bike.
Can I modify the circuit to suit my specific electric bike?
Absolutely! The accompanying circuit diagram can be adjusted to suit the needs of your electric bike as a starting point. Depending on your demands, you can change the component values or add new functionality.
Is it safe to build an electric bike speed controller at home?
It is normally safe to make an electric bike speed controller at home as long as all safety precautions are taken and the process is done properly. Nonetheless, it is essential to make sure that during the assembly process, correct insulation, secure connections, and adherence to electrical safety requirements are all followed.
Are there any legal restrictions for using a homemade speed controller?
Knowing the local laws and rules governing electric bikes is vital before utilizing a homemade speed controller. Speed control devices for electric bikes may be subject to special regulations or restrictions in some areas. To avoid any legal issues, always be sure you abide by the law.