Microdrones are becoming more and more common because of their small size, adaptability, and cost. You may personalize a tiny drone’s characteristics and learn more about the underlying technologies by building your own. This article will examine how to construct a tiny drone that can fly utilizing a DC motor, a crucial part of the drone’s propulsion system.

The Basics
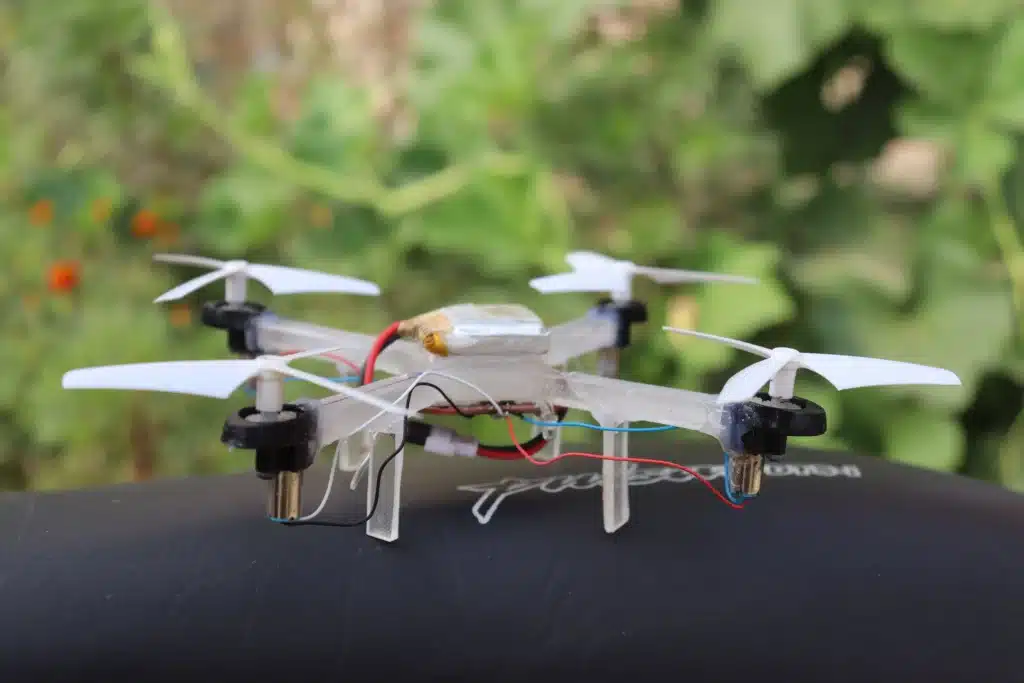
Let’s get acquainted with the fundamental parts needed to build a tiny drone before we start the construction process. A frame, motors, propellers, a flight controller, batteries, and a transmitter/receiver system are some of these parts. The DC motor is essential for moving the drone and preserving flight stability.
Gathering the Materials
- Mini drone frame
- DC motor
- Propellers
- Flight controller
- Battery
- Transmitter and receiver
- Wires and connectors
- Soldering iron
- Screwdriver set
- Wire cutter/stripper
- Heat shrink tubing
- Velcro straps
Assembling the Frame

Assembling the frame is the first step in creating your little drone. All the other components are held together by the frame, which acts as the building’s backbone. the following procedures to frame and assemble:
- Lay down the frame’s parts first, then mark where they go in relation to one another.
- Using screws and a screwdriver, fasten the arms to the frame’s main body.
- To avoid any swaying or instability during flight, make sure the arms are properly fastened.
You’ll have a solid base to place the other components once the frame is put together.
- Also Read This Article:- 5V PWM Signal Booster Convert 12V PWM Signal Generator
- Also Read This Article:- How to Make a BLDC Motor ESC Using MOSFET
Wiring the DC Motor
The DC motor must now be connected to the drone’s circuit. The DC motor is in charge of turning the propellers and producing the thrust required for flight. To properly wire the DC motor, adhere to the following steps:
- Determine the DC motor’s positive and negative terminals.
- Attach the positive terminal of the motor to the flight controller’s positive terminal.
- Attach the negative terminal of the flight controller to the negative terminal of the motor.
- To create a reliable connection and ensure adequate conductivity, use wires, and connections.
- Connections should be insulated with heat shrink tubing and soldered if necessary.
- For the motor to receive the required power and work properly, proper wiring is required.
Adding the Propellers

For the creation of lift and propulsion, the propellers are essential. Propeller selection should take size, pitch, and material into account. To attach the propellers to the DC motor, take the following actions:
- Be sure the propellers you choose for your micro drone are compatible with the motor’s requirements.
- Make sure they fit snugly, and attach the propellers to the motor’s shaft.
- With a screwdriver or the included fastening mechanism, tighten the propellers.
- Verify that the propellers are balanced and perfectly oriented.
Installing the Flight Controller
The drone’s brain, the flight controller, processes sensor data and modifies motor outputs to maintain stability. Installing the flight controller involves the following steps:
- Find the location on the frame where the flight controller will be mounted.
- To firmly fasten the flight controller to the frame, use screws or adhesive.
- as directed by the manufacturer, attach the flight controller to the DC motor and other required parts.
- In accordance with the instructions supplied, calibrate the flight controller.
Smooth and controllable flight maneuvers are guaranteed with a properly mounted and calibrated flight controller.
Powering the Drone
You’ll need a suitable battery to run your small drone. While choosing a battery, keep things like capacity, voltage, and weight in mind. To power your drone, take the following actions:
- Following the proper polarity, attach the battery to the power distribution board or flight controller.
- Use Velcro straps or other suitable closures to secure the battery.
- To maximize the battery’s performance and duration, make sure it is completely charged before the flight.
- Keep in mind to handle and charge the battery carefully while adhering to safety regulations.
Testing and Troubleshooting
It’s important to test your small drone’s functionality when the wiring and assembly are complete. To test and debug your drone, follow these steps:
- Activate the receiver and transmitter equipment.
- Check to see if the motors are spinning smoothly and in the right direction after turning on the drone.
- Check to see if the transmitter inputs are being received by the flight controller.
- Fly a test plane in a secure, open region that is free of obstacles and other persons.
- See the drone’s response, steadiness, and ability to move about.
- Investigate any problems that cropped up during testing, such as motor or flight control concerns.
Before conducting actual flight missions, testing and problem-solving are crucial for locating and fixing any flaws.
Tips for Flying the Mini Drone
Flying a mini drone can be a thrilling experience. Here are some tips to enhance your flying skills:
- Begin with slow, tiny movements and build up to more sophisticated ones over time.
- Before attempting more complex flight maneuvers, practice hovering and keeping a stable altitude.
- Discover the fundamentals of flying, including how to hover, spin, and fly forward and backward.
- Try out various flying configurations, then customize the drone’s sensitivity levels to suit your tastes.
- To reduce external factors that can affect flying stability, practice in quiet weather.
Remember, practice makes perfect, so enjoy the learning process and steadily improve your piloting skills.
Customization and Upgrades
One of the exciting aspects of building your own mini drone is the ability to customize and upgrade its features. Here are some customization ideas and potential upgrades:
- For better visibility and aesthetics, add LED lighting.
- Add a camera or a gimbal to capture aerial images or videos.
- To improve performance, try out different propeller designs.
- To gain access to more sophisticated features and flight modes, upgrade the flight controller.
- Change the color or add decals to customize the drone’s appearance.
Legal Considerations
It’s crucial to educate yourself about local drone operation laws and restrictions before using your tiny drone. The following materials can assist you in comprehending the legal implications:
- Check the website of your local aviation authority to find drone rules and restrictions that apply to your area.
- Join online drone enthusiast communities or forums to exchange expertise and stay informed about legal requirements.
- To learn more about regional drone laws and best practices, speak with nearby drone clubs or enthusiast organizations.
Maintenance and Care
To ensure your mini drone continues to perform optimally, regular maintenance is essential. Here are some maintenance tips:
- After each flight, clean your drone to get rid of any dust, dirt, or debris.
- Look for any evidence of wear or damage on the propellers, and repair them if necessary.
- Replace the battery if necessary after inspecting it for swelling, damage, or diminished performance.
- Do regular checks on the wiring, connections, and parts to make sure they are safe and working properly.
- Keep your drone out of the sun and severe temperatures in a cool, dry location.
Conclusion
Using a DC motor to build a flying miniature drone offers a practical experience that blends creativity, technical know-how, and the rush of flight. You can start an exciting journey of building your own small drone and discovering the virtually endless possibilities of aerial exploration by following the instructions provided in this article. Remember to fly responsibly, adhere to safety precautions, and have pleasure in operating your very own personalized small drone.
FAQ
Can I use a different type of motor for my mini drone?
Although a DC motor is frequently used in micro drones, other motor types, such as brushless motors, are also available. The directions in this post, however, are focused primarily on creating a miniature drone with a DC motor.
How far can a mini drone fly?
A micro drone’s range might change based on the transmitter/receiver system it uses and the surrounding surroundings. Little drones often have a range of a few hundred meters to a kilometer, but for precise information, it’s vital to check the specifications of your individual components.